Lesson of the Day 77: The Subtraction Strip Board - Mastering Subtraction Facts Through Hands-On Strip Exploration
Published on: May 16, 2026
"The hands are the instruments of man's intelligence." — Dr. Maria Montessori
If your child has been working with the Addition Strip Board and joyfully building sums by laying colored strips end-to-end, you may already sense what comes next. The child who has discovered that 4 + 5 = 9 will, sooner or later, begin to wonder: what happens when we take something away? What remains when part of a whole is removed? This is the question that subtraction answers — and the Montessori classroom has a beautifully concrete material to help the child explore it: the Subtraction Strip Board.
Where the Addition Strip Board builds up, the Subtraction Strip Board invites the child to work backwards — to start with a known quantity and physically remove part of it, reading the difference right off the board. It's the same elegant, hands-on approach, now turned toward the inverse operation. Through repeated, self-chosen work with this material, subtraction facts don't become a source of anxiety or rote memorization. They become something the child sees, touches, and ultimately owns.
Today, let's explore the Subtraction Strip Board in depth — what it is, where it fits in the Montessori math sequence, how to present it, and how you can bring this powerful material into your home.
📐 What Is the Subtraction Strip Board?
The Subtraction Strip Board is a Montessori math material designed to help children learn and internalize all the basic subtraction facts — every combination from 1−1 through 18−9. It is the natural companion to the Addition Strip Board, and the two materials share a family resemblance. The Subtraction Strip Board consists of three components:
- The Board: A flat board ruled into a grid with the numbers 1 through 18 printed along the top row. Just like the addition board, a vertical red line appears at the number 10, visually distinguishing single-digit results from those involving the teens. The board is typically 18 squares wide — one square for each number.
- Blue Strips: Nine wooden or plastic strips, numbered 1 through 9, all in blue. These represent the number being subtracted (the subtrahend). Each strip's length corresponds to its number — the "5" strip is exactly five squares wide.
- A Blank Strip (or "Difference Strip"): A single, unnumbered strip — sometimes natural wood, sometimes a neutral color — that is used to cover or "cross out" the portion of the board that extends beyond the minuend (the starting number). This blank strip is what makes subtraction visible. It essentially hides the numbers the child doesn't need, framing the problem beautifully.
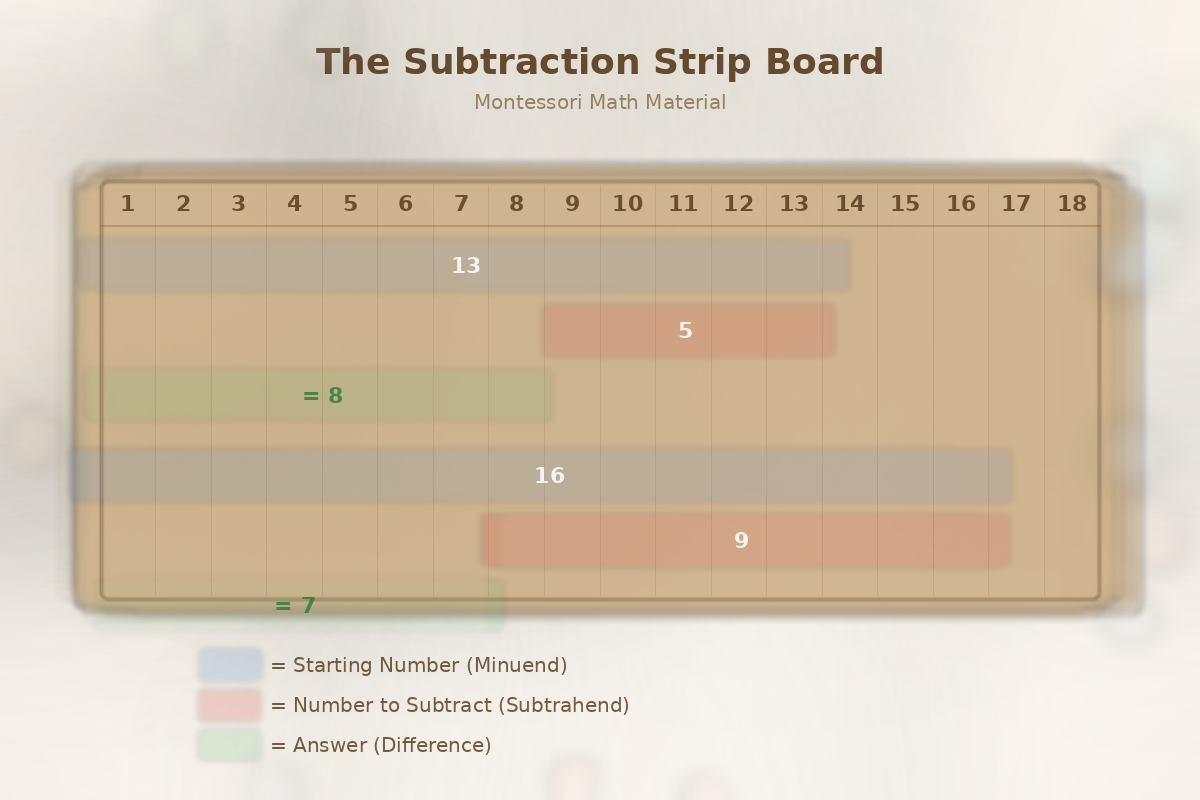
Here's how it works in practice: the child begins by identifying the minuend (the number they're subtracting from, say 9) and uses the blank strip to cover everything on the board beyond 9. Then they place the blue strip for the subtrahend (say, 4) starting from the right side of the visible board and working leftward. The left edge of the blue strip now points to the difference — in this case, 5. The child reads: 9 minus 4 equals 5.
Subtraction becomes a physical act of covering up and taking away — a concept so tangible that children often light up with understanding the very first time they use this material.
🧩 Where Does the Subtraction Strip Board Fit in the Montessori Math Sequence?
The Subtraction Strip Board occupies a critical place in the Montessori memorization of math facts sequence — the body of work that helps children transition from understanding operations concretely to knowing the facts fluently. Here's where it typically falls:
- Counting and Quantity (1-10): The child has mastered one-to-one correspondence using materials like the Number Rods, Spindle Boxes, and Cards and Counters.
- Introduction to the Decimal System: Through the Golden Bead Material, the child understands units, tens, hundreds, and thousands — and has performed subtraction (as well as addition) with concrete beads, including exchanging.
- Linear Counting: The child has worked with the Seguin Boards, the Hundred Board, and the Bead Chains for skip counting.
- The Addition Strip Board: The child has explored the Addition Strip Board and is comfortable with the concept of combining two quantities to find a sum. Ideally, the child has begun to internalize many of the addition facts.
- The Subtraction Snake Game: Some Montessori classrooms introduce the Subtraction Snake Game before or alongside the Strip Board. In this exercise, children start with a "golden snake" made of ten-bars and replace segments with colored bead bars from the Short Bead Stair, experiencing subtraction as the breaking apart of known quantities.
- The Subtraction Strip Board ← You are here!
- Subtraction Charts and Blind Charts: After extensive work with the Strip Board, children move to the Subtraction Charts (Charts 1 through 4), which progressively abstract the facts until the child can recall them from memory.
- The Stamp Game and Bead Frame: These materials, including the Stamp Game and the Bead Frame, continue to reinforce multi-digit subtraction operations with increasing abstraction.
Age Range
The Subtraction Strip Board is typically introduced between ages 5 and 6.5 in the Primary (Casa) environment, though some children encounter it in early Lower Elementary (ages 6-7). The child should be comfortable counting to at least 18, understand the basic concept of "taking away," and ideally have had solid experience with the Addition Strip Board. A child who has done subtraction with the Golden Bead Material — physically removing beads from a quantity — is beautifully prepared for this more abstract step.
📦 Materials You'll Need
If you're working in a classroom, you likely have a commercially produced Subtraction Strip Board on your shelves. If you're setting this up at home, here's what you'll need:
- The Subtraction Strip Board — a ruled board numbered 1-18 across the top
- Blue numbered strips (1-9) — each strip's length equals its number value in squares
- One blank (neutral) strip — long enough to cover up to 17 squares (some sets include multiple blank strips of varying lengths; one long one works fine)
- A pencil and paper — for recording equations
- Subtraction Tables booklet or pre-printed equation sheets (optional but helpful for structured practice)
You can find quality Montessori subtraction strip boards from educational suppliers. Here are two well-reviewed options:
- Montessori Subtraction Strip Board - Complete Set — A full wooden set with the board, blue strips, and blank strip, ready for home or classroom use.
- Adena Montessori Addition and Subtraction Strip Board Set — A combined set that includes both the addition and subtraction materials, which is an excellent value if you're building a home Montessori math shelf.
DIY Note: If you're handy, you can make your own board! Print a grid on sturdy cardstock (18 columns, numbered 1-18 across the top) and cut strips from colored card stock. The key is precision — each strip must be exactly the right length so the math works out correctly when strips are placed on the board. A ruler and some patience go a long way.
🎓 How to Present the Subtraction Strip Board
As with all Montessori presentations, approach this lesson with calm, deliberate movements and a spirit of shared discovery. The child should be seated comfortably at a table with plenty of workspace. Invite the child warmly — "I have something new and wonderful to show you today. Would you like to come and see?"
Presentation 1: Introduction to the Material
- Carry the material to the table together. Place the board in front of the child. Lay the blue strips in order on one side and the blank strip on the other side. Take a moment to let the child observe. Children are naturally curious — let them look, touch, and ask questions.
- Orient the child to the board. Run your finger slowly along the numbers at the top: "Look — we have the numbers 1 through 18 along the top, just like on our addition board." Point to the red line at 10: "And here is our red line at ten. Do you remember what this means?" Allow the child to respond. "Yes — everything past this line is more than ten."
- Introduce the blank strip. Hold up the blank strip: "This strip is special. It has no number on it. We're going to use it to help us with subtraction — with taking away."
- Build the first equation. Say, "Let's try nine minus four." First, place the blank strip on the board so that its left edge aligns with the line after the number 9. The blank strip now covers all the numbers from 10 through 18. Only the numbers 1 through 9 are visible. "We're starting with nine, so we only need to see up to nine. Everything else gets covered up."
- Place the blue strip. Select the blue 4 strip. Place it on the board so that its right edge aligns with the right edge of the visible board (at 9), and it extends leftward. The left edge of the blue strip will now sit at the number 5. "We're taking away four."
- Read the difference. Point to where the left edge of the blue strip sits: "The blue strip starts at 5. So nine minus four equals five." Run your finger from 1 to 5 to show the remaining quantity.
- Record the equation. Write on the paper: 9 − 4 = 5. Let the child watch you write it, connecting the concrete experience to the symbolic notation.
- Clear the board and invite the child to try another combination. Let them choose the numbers. Offer gentle guidance only if needed — the material is largely self-correcting.
Presentation 2: Working Through a Minuend Systematically
Once the child is comfortable with the basic mechanics, introduce a more structured exploration:
- Choose a starting number (minuend). Say, "Today, let's find all the ways to subtract from seven." Place the blank strip to cover everything after 7.
- Subtract 1. Place the blue 1 strip at the right edge of the visible board. Read the result: "Seven minus one equals six." Record: 7 − 1 = 6.
- Subtract 2. Replace the blue 1 strip with the blue 2 strip. Read: "Seven minus two equals five." Record: 7 − 2 = 5.
- Continue through all possible subtractions: 7 − 3 = 4, 7 − 4 = 3, 7 − 5 = 2, 7 − 6 = 1. Each time, the child removes the previous blue strip, places the new one, reads the difference, and records it.
- Observe the pattern together. When all the equations are written, look at the list with the child: "What do you notice?" Many children will observe that as the number being subtracted gets bigger, the answer gets smaller. Some will notice that 7 − 3 = 4 and 7 − 4 = 3 — the numbers seem to "flip." These observations are golden. They are the seeds of mathematical reasoning.
- Repeat with different minuends on subsequent days: all the subtractions from 8, from 10, from 13, and so on. The child can work through these independently once they understand the process.
Presentation 3: Working with Teen Numbers (Minuends Greater Than 10)
This is where the Subtraction Strip Board reveals its full power. Children who have been working with single-digit minuends will eventually be ready to tackle equations like 15 − 7 or 13 − 6.
- Set up the problem. Say, "Let's try thirteen minus five." Place the blank strip so that it covers everything after 13. The numbers 1 through 13 are now visible.
- Place the blue 5 strip at the right edge (at 13), extending leftward. The left edge of the strip lands on 8.
- Read the difference: "Thirteen minus five equals eight."
- Record: 13 − 5 = 8.
Notice how naturally the child works across the red line at 10. There is no complicated "borrowing" procedure — no abstract algorithm to memorize. The child simply places the strip and reads the answer. The red line serves as a quiet visual reference point, building an intuitive sense that subtracting from teen numbers often yields single-digit results. This prepares the child beautifully for the more formal subtraction algorithms they will encounter later.
🔄 Extensions and Variations
Once the child has mastered the basic presentations, there are several ways to deepen and extend the work:
1. Subtraction Tables Booklet
Many Montessori classrooms provide a small booklet with all the subtraction combinations organized by minuend. The child works through the booklet page by page — one day doing all the subtractions from 9, another day all the subtractions from 14. This systematic approach ensures that every combination gets practiced. The child records each answer, building a comprehensive record of their work.
2. The Connection to Addition
This is one of the most powerful extensions. After the child has worked a subtraction equation — say, 8 − 3 = 5 — ask gently: "If eight minus three is five, what do you think five plus three equals?" If you have the Addition Strip Board nearby, the child can verify this. This builds the understanding that addition and subtraction are inverse operations — two sides of the same coin. This is a foundational algebraic concept, and the child discovers it through their own hands and their own reasoning.
3. Finding Patterns
Encourage the child to look for patterns as they work. When they've completed all the subtractions from a given number, they might notice:
- The differences decrease by one as the subtrahend increases by one
- Subtracting a number from itself always gives zero (if you extend the work to include this case)
- Subtracting 1 always gives the number just before — connecting to their counting knowledge
- Certain "fact families" emerge: 8 − 3 = 5, 8 − 5 = 3, 3 + 5 = 8, 5 + 3 = 8
4. Equation Slips
Write subtraction equations on small slips of paper (without the answers) and place them in a small basket or envelope. The child draws a slip at random, solves it using the Strip Board, and writes the answer. This adds an element of surprise and keeps the work feeling fresh. It's also a wonderful way to assess which facts the child knows confidently and which ones they still need the board to solve.
5. Mental Math Transition
As the child becomes fluent, begin encouraging them to predict the answer before placing the strip. "Before you put the strip down — what do you think twelve minus four will be?" Let them place the strip to check. Over time, they'll find they can "see" the answer in their mind without needing the material. This is the beautiful Montessori arc from concrete to abstract.
💡 Tips for Parents
Bringing the Subtraction Strip Board into your home can be a deeply rewarding experience — but as with all Montessori materials, the approach matters as much as the material itself. Here are some guiding principles:
Follow the Child
Not every child will be ready for subtraction at the same age, and that's perfectly fine. If your child is still joyfully working with the Addition Strip Board, let them continue. The move to subtraction should feel like a natural next step, not a forced march. Watch for signs of readiness: the child can add fluently with the strips, shows curiosity about "taking away," or begins asking questions like "What if we go backwards?"
Keep Sessions Short and Joyful
A five-year-old doesn't need to work through 30 subtraction equations in a sitting. Three to five problems, done with focus and pleasure, are worth far more than a long session that ends in frustration. Let the child stop when they want to stop. The material will be there tomorrow.
Resist the Urge to Drill
It can be tempting, especially if you're aware of what your child's peers are doing in conventional school settings, to push for speed and memorization. But the Montessori approach trusts that fluency comes through understanding, not pressure. A child who deeply understands what subtraction means — who can visualize it, who has built it with their hands dozens of times — will internalize the facts naturally. The Strip Board is not a flashcard. It's a thinking tool.
Offer the Material, Then Step Back
After your initial presentation, make the Subtraction Strip Board available on a low shelf where the child can choose it independently. Some of the most powerful mathematical learning happens when a child decides, on their own, to sit down and work through "all the ways to subtract from eleven." Your role is to prepare the environment and then trust the child's inner drive.
Connect to Daily Life
Subtraction is everywhere, and pointing this out helps the child see math as a living, useful skill rather than an isolated classroom exercise. "You had eight strawberries and ate three. How many are left?" These real-world connections reinforce the Strip Board work beautifully. You don't need to make it a formal quiz — just weave subtraction naturally into conversation.
Don't Skip the Recording
Writing the equation after building it on the board is an important part of the work. It connects the concrete experience to the abstract symbol. Even if the child's handwriting is wobbly, the act of writing 12 − 5 = 7 after physically discovering it on the board creates a powerful neural link. Keep a special notebook or folder for their math work — children love looking back at what they've accomplished.
🕰️ When to Introduce This Material
Timing matters in Montessori education, not because there's a rigid schedule, but because each material builds on what came before. Here are the readiness signs that suggest your child is prepared for the Subtraction Strip Board:
- Comfort with numbers to 18: The child can count forward and backward to at least 18 with confidence. Work with the Hundred Board and Seguin Boards supports this.
- Understanding of subtraction as "taking away": The child has had concrete experiences with subtraction — removing Golden Beads from a quantity, taking objects away from a group, or working with the Subtraction Snake Game.
- Experience with the Addition Strip Board: The child understands how strip boards work — how to place strips, read results, and record equations. If your child has worked with the Addition Strip Board, the transition to subtraction will feel familiar and intuitive.
- Fine motor readiness: The child can handle the strips carefully, place them precisely on the board, and write simple equations.
- Interest: Perhaps the most important indicator of all. A child who is curious about subtraction, who asks about "the difference," or who wants to know "how many are left" is telling you they're ready.
🌿 The Bigger Picture: Why Concrete Subtraction Matters
In many conventional math programs, subtraction is introduced as a set of facts to be memorized — or worse, as the "hard" inverse of addition that children should simply power through. Worksheets full of problems, timed tests, and the dreaded "borrowing" algorithm can turn subtraction into a source of math anxiety that follows children for years.
The Montessori approach takes a radically different path. By giving the child a material that makes subtraction visible and tangible, it transforms an abstract operation into a concrete experience. The child isn't told that 14 − 6 = 8. The child discovers it — by covering the board at 14, placing the blue 6 strip, and seeing with their own eyes that 8 remains. This discovery belongs to the child. It becomes part of their mathematical identity.
Over time, through repeated, self-directed work, the facts move from the hands to the mind. The child who once needed to place every strip will begin to "just know" that 9 − 4 = 5. But this knowledge is qualitatively different from memorized knowledge — it's rooted in understanding, connected to addition through the inverse relationship, and resilient under pressure. A child who truly understands subtraction can reconstruct a forgotten fact. A child who has only memorized it is stuck.
This is the gift of the Montessori math materials: they don't just teach facts. They build mathematical thinkers.
📝 A Quick Summary
| Material | Subtraction Strip Board with blue strips (1-9) and blank covering strip |
| Age Range | 5 to 6.5 years (Primary/Early Elementary) |
| Prerequisites | Counting to 18, Addition Strip Board experience, concrete subtraction with Golden Beads |
| Direct Purpose | Memorization of basic subtraction facts (1-1 through 18-9) |
| Indirect Purpose | Understanding the inverse relationship between addition and subtraction; preparation for abstract computation |
| What Comes Next | Subtraction Charts 1-4, Stamp Game subtraction, Bead Frame subtraction |
The Subtraction Strip Board is one of those Montessori materials that looks deceptively simple — a board, some colored strips, and a blank piece of wood. But in the hands of a child who is ready for it, it becomes a portal into genuine mathematical understanding. It transforms subtraction from an abstract concept into something a child can see, build, and own.
Set it on the shelf. Give your child the first presentation. And then step back and watch what happens. You may just find them sitting quietly, working strip after strip, equation after equation — not because anyone asked them to, but because the work itself is deeply, intrinsically satisfying. That's the Montessori magic at work. 🌻